Tampilkan postingan dengan label with. Tampilkan semua postingan
Tampilkan postingan dengan label with. Tampilkan semua postingan
Selasa, 21 Januari 2014
Pico Wind Turbine With Bicycle Wheel
This cheap homemade Pico-class wind turbine is made with several components of a bicycle wheel. Such as: bearings and axle along housing (hub), rim. Bicycle wheel hub has proven strong enough to bear the weight up to 100 kg, resistant to: water, dust and mud; can spin at high speed, available in the market at an affordable price. If broken it will be easily repaired. For downhill mountain bike, axles bear much larger than 100 kg load.
Because of that, those bicycle wheel components are decided to use for this turbine. Photo below shows 3 turbine blades made of aluminum, a bicycle wheel rim that serves as pulley and seen as a circle, and in the center is bicycle wheel hub. Turbine blade pitch angle can be adjusted (adjustable pitch) by simply turning the nut. This cheap wind turbine can generate 17 watts of electric power at wind speeds as low as 20 kmh.
For all photos and drawings, please click on photos and drawings for a bigger version.


Turbine blade material is aluminum 1100 with 1 mm thickness and it is widely available in the market. Actually it would be more stronger if using aluminum 5083, but it is not available in small quantity.
The center of the turbine is a triangular-shaped steel plate. The triangular plate serves to hold the turbine blades on a bicycle wheel hub. There are two pieces of triangular plates with 6 of 12 mm bolts (M8 thread) to clamp the bicycle wheel hub. That 12 mm bolts are also holding turbine blades, each blade fastened by three bolts.
The photo above shows a bicycle wheel rim (circular shaped) size 16 inches, which is fastened with 3 screws M4 to the blades of the turbine and rotates with the turbine. Each blade has a 1 piece bolt that ties the rim. The rim serves as a pulley which turns a dynamo via belt transmission. A green transmission belt and dynamo pulley are shown at the bottom center of the photo.

There are 6 holes of 8 mm diameter for M8 bolts. Position of each hole must be precise because it will affect turbine blades installation. As seen in the above photo turbine blades are overlapping. Note on each corner of triangle plate, each bolt in triangle corner is designed to be holding two blades at once, so efficiently. Theore with 3 bolts to hold each blade, and the total number of turbine blades are 3 blades, it does not use 9 bolts, but only use 6 bolts. If this triangle plate fabrication was not precise then turbine blades would be difficult to install.
Turbine blades are made from 1 mm thick aluminum 1100. Width at the base is 200 mm, width at the tip is 55 mm, and the length of 670 mm. Note the red numbers, there are three holes of 8 mm. To drill hole 1 and hole 2, the blade must be cut from aluminum sheet. By using the above triangular steel plate as a pattern or a die, hole number 1 and 2 can be drilled. Position triangle plate so that the axis of the hole number 1 is 20 mm from the side of the blade length, and 25 mm from the base of the blade, see picture below. After hole number 1 is drilled, put bolt into hole number 1 so the blade and triangle plate are sandwiched. Align the base of the blade to become parallel with the edge of triangle plate, then hole number 2 can be drilled with guidance by triangle plate.
Below drawing describes how to use triangle plate as a pattern to drill hole 1 and 2. Position of hole 1 is used as a erence point. Then align triangle edge (red) with the base of blade (yellow), so that the position of hole 2 is obtained.

Hole number 3 slightly oval shape and somewhat difficult to mark and to drill, because of its position on the curved part of blade to form a wing profile. See the picture below, the blade that has been cut (light blue) already has hole number 1 and 2. Blade mounted on two triangular plates (gray) with two long bolts. Between the two plates there is a bicycle wheel hub pinched, and serves as a spacer between those two triangle plates. Bend the blade at hole number 3 position to about 30 mm form the wing profile. As seen on the right, hole number 3 is drilled by a drill bit. Vise and drill stand are needed to drill hole number 3, the result hole will be in oval shaped. The wing profile blade can be adjusted by nuts of bolt in hole 3, so this turbine has adjustable pitch angle. Be sure to always use a wide ring and collar nut to press the blade against the triangle plate. If using an ordinary nut, the blade can be damaged as it is pressed.


Grid pole has diameter of about 20 cm. Note that the plate axis is aligned with the electric pole axis. After wing profiles are formed, those three blades are installed as the photo below.

Wing profile at blade tip will appear as shown below.
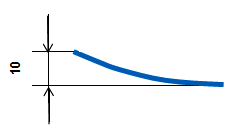
With the turbine facing up, blade tip leading and trailing edge will create a distance of 10 mm because of the pitch angle. Suppose there is a wind blowing from the top of drawing, the blade will move to the left. Pitch angle also affects the strength of the blade, in addition to affecting the speed. The greater pitch angle the stronger the blade. Conversely, the smaller pitch angle of blade, will be more easily bent backwards when blown by the wind.
With a distance of 10 mm between the leading and trailing edge, the blade can stand high wind and easily start spinning by low wind with speed of 10 kmh or 2.8 ms.
According to the test I did, the minimum distance between the leading edge to the trailing edge is 3 mm. If set to a minimum distance, turbine blade wing profile (airfoil) will be flattened thereby reducing drag while spinning at high speed. As drag reduced, then the turbine will spin faster and the power will increase. The effect of low profile blade can be seen at wind speeds above 20 kmh or 5.6 ms, the power will be increased by about 30%. But the strength of the blades will be much reduced, you should use aluminum 5083 as material for low profile blades.
In addition to nuts adjusment, blade angle can also be adjusted (pitch adjustment) by curving the blade. Make sure all the blades have the same curve or wing profile. Theore, this wind turbine has two ways to adjust pitch angle and wing profile. You can play with different pitch adjustment and wing profile to suit your conditions.
Note the use of the ring and flange nut to press and hold blades. Flange nuts are also used for clamping triangle plate to avoid that nuts loose easily. While regular nut is used only for locking flange nuts, look at the bottom of the bolt in the middle.
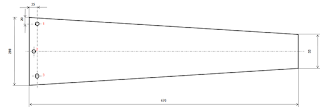
Prepare a bicycle wheel rim size of 16 inches. Keep in mind that 16 inches is not the diameter of wheel rim, but it is the size of a bicycle tire that can be fitted on that rim. 16 inches rim has inside diameter of about 288 mm, and become a pulley of 905 mm circumference.
Drill 3 holes of 4 mm diameter at bicycle wheel rim size 16 inches. Make sure those 3 holes are equidistant from one another. Put turbine facing down, make sure in level position like the photo below. Put the bicycle wheel rim on the turbine, use 3 paper clips to hold rim to blades. With a vernier caliper make sure rim position is really centric to the axis of turbine hub. Mark position of those 3 rim holes on blades, then drill those 3 holes on turbine blades for bolts to hold the rim. Position of 3 holes on blades must be at flat part of blade, not at curved part (wing profile) of blade.

The second from the top photo most shows rim is fastened by M4 screws with a length of about 15 mm. That photo shows also bolts are positioned on the flat area of blades, not on curved area. Screws have wide washers and also rectangular aluminum patches to reinforce screw area. Rim also glued to stick to the blades. Glue that I normally use is Aica Aibon as it is waterproof and can stand with vibration. Ive tried with epoxy type glue but it just fall out due to vibration.
Turbine needs balancing prior to use. It is balanced by mounted it vertically on the frame and rotated by hand, then allow it to stop by itself. If frame has not fabricated yet, use a vice to hold turbine axle bolt, make sure thread will not damaged by using wooden wedges. Make sure there is no wind in the balancing area, better if it is inside a closed room or garage. The most heavy blade will always stop at the bottom. Balancing is done by cutting the most heavy blade tip a little, about 1-2 mm. Then turn the turbine again by hand, and let it stop by itself. If blades stop positions are always changing or random, that means turbine blades are balanced.
In addition to nuts adjusment, blade angle can also be adjusted (pitch adjustment) by curving the blade. Make sure all the blades have the same curve or wing profile. Theore, this wind turbine has two ways to adjust pitch angle and wing profile. You can play with different pitch adjustment and wing profile to suit your conditions.
Note the use of the ring and flange nut to press and hold blades. Flange nuts are also used for clamping triangle plate to avoid that nuts loose easily. While regular nut is used only for locking flange nuts, look at the bottom of the bolt in the middle.
Prepare a bicycle wheel rim size of 16 inches. Keep in mind that 16 inches is not the diameter of wheel rim, but it is the size of a bicycle tire that can be fitted on that rim. 16 inches rim has inside diameter of about 288 mm, and become a pulley of 905 mm circumference.
Drill 3 holes of 4 mm diameter at bicycle wheel rim size 16 inches. Make sure those 3 holes are equidistant from one another. Put turbine facing down, make sure in level position like the photo below. Put the bicycle wheel rim on the turbine, use 3 paper clips to hold rim to blades. With a vernier caliper make sure rim position is really centric to the axis of turbine hub. Mark position of those 3 rim holes on blades, then drill those 3 holes on turbine blades for bolts to hold the rim. Position of 3 holes on blades must be at flat part of blade, not at curved part (wing profile) of blade.
Turbine needs balancing prior to use. It is balanced by mounted it vertically on the frame and rotated by hand, then allow it to stop by itself. If frame has not fabricated yet, use a vice to hold turbine axle bolt, make sure thread will not damaged by using wooden wedges. Make sure there is no wind in the balancing area, better if it is inside a closed room or garage. The most heavy blade will always stop at the bottom. Balancing is done by cutting the most heavy blade tip a little, about 1-2 mm. Then turn the turbine again by hand, and let it stop by itself. If blades stop positions are always changing or random, that means turbine blades are balanced.
Kamis, 28 November 2013
Interview With Abie Jie Assegaff Dimitri Arleri from Indonesia
Beberapa waktu yang lalu, saya menulis sebuah artikel tentang kehebatan Dimitri Arleri di dunia cardistry lewat videonya yang berjudul "Silent Transition". Di akhir artikel, saya juga berjanji untuk memuat interview dengan Cardist Indonesia yang seolah-olah mengingatkan saya pada Dimitri Arleri, baik secara fisik maupun secara originalitas gaya.
Yap, Card Flourisher itu bernama Abie Jie Asegaff, biasa dipanggil Abie atau Abee. Dalam dunia card flourish, originalitas dalam hal moves ataupun cara berpenampilan menjadi hal yang wajib. Contohnya adalah Daniel Madison dengan video hitam-putihnya, DeVo yang terkenal dengan wajahnya yang tetap misterius hingga saat ini, atau Dan and Dave Buck yang sangat populer karena two handed cuts dengan tingkat kesulitannya yang sangat tinggi. Nah, sosok Abie adalah contoh dari Card Flourisher Indonesia yang mampu mengembangkan originalitasnya, baik dalam gerakan card flourish ataupun dalam style saat perform. Penampilan Abie yang pertama kali menarik perhatian saya adalah dalam video berjudul "Beat and Flow", bersama Sham dan Chandreek Struggle yang termasuk dalam "5 video card floursih favorit blog Wikumagic". Dan tak lama kemudian, saya kembali menemukan video kolaborasi luar biasa yang melibatkan Abie di dalamnya, berjudul "Nine of Diamonds"
Tanpa panjang lebar, berikut interviewnya :

1. Kapan dan apa alasan anda menekuni card flourish?
Saya mulai bermain flourish itu sekitar awal Juni 2009..,saya suka flourish karena permainan ini sangatlah unik dan membutuhkan kreativitas serta kesulitan dari membangun move-move yang membuat penasaran dalam mempelajarinya sehingga ada kepuasan tersendiri ketika mempelajari permainan card flourish ini ;)
2. Siapa card artist favorit anda? Apa deck yang biasanya sering dipakai buat perform?
Dimitri Arleri ,Sebastian Skowron, Dan&Dave, Tobias Levin dan masih banyak flourisher yang cukup mnjadi favorite dan inspirasi saya. Deck favorite saya yaitu Alladin dan Tally Ho regular
3. Seberapa sering dan berapa lama waktu latihan bung Abie dalam card flourish?
Saya hampir setiap hari berlatih flourish jika ada waktu senggang..,biasanya hanya sekitar 15-20 menit.
4. Soal style, di dalam video Bung Abie hampir selalu terlihat mengenakan earphone atau headphone. Ada arti khusus di balik style anda?
Hahhaa..,kalo soal style emang ga pernah saya buat-buat..,saya suka musik,apalagi mendengarkannya sambil latihan.,karena gerakan-gerakan. flourish menurut saya mempunyai tempo-tempo yang cocok jika diiringi dngan musik :D
5. Oh ya, di foto-foto anda saya juga melihat suatu move yang sepertinya semacam "long card spring". Ada cerita di balik move itu?

Foto itu merupakan salah satu foto favorite saya karna dengan foto itu saya bisa menjuarai contest yang diadakan oleh ellusionist.com taraf internasional..,dan alhamdulillah saya bisa mendapatkan Deck Arcane Gold.
6. Apa moves favorit anda saat "live jamming"? Ada tips menghilangkan rasa grogi saat main flourish di depan orang lain?
Move favorite saya adalah "spring",karena menurut saya spring merupakan salah satu move yg bs membuat orang-orang awam terkagum-kagum :D
Klo grogi pada saat perform semua orang pasti mengalaminya,sayapun sampai sekarang masih suka grogi koq,tapi rasa grogi akan hilang dengan sendirinya ketika para penonton memberikan tepuk tangan yang meriah.
7. Pengalaman paling berkesan selama menekuni card flourish? Suka-duka?
Pengalaman paling berkesan yaitu hanya dengan sebuah kartu saya bisa membanggakan kedua orang tua saya dengan menjuarai beberapa kompetisi nasional dan internasional..,sayapun juga bangga karena card flourish bisa mempertemukan saya dengan teman-teman flourisher yang sangat ramah dan menyenangkan baik di Indonesia ataupun luar negeri..,dan sepertinya saya belum pernah mendapatkan duka didalam bermain flourish..,Because card flourish 100% fun ;)
Prestasi yang sudah diraih Abie antara lain :
Juara 1 ICC II (Indonesian Cardistry Contest 2).,
Juara 1 skill toys (toy city live competition).,
Juara 1 ellusionist.com contest..,
8. Apa pendapat anda tentang video flourish terbaru Dimitri Arleri yang berjudul "Silent Transition"?
Wahh..,sepertinya itu akan jadi best video of the year ..,semua gerakan-gerakannya sangatlah original dan penuh kreativitas yang tinggi..,seorang Dimitri sangatlah jarang membuat video.,tp sekalinya dia muncul dengan video barunya pasti dapat membuat gempar orang-orang yang melihatnya..,salut buat Dimitri
9. Ada pesan-pesan buat teman-teman yang sedang dan akan menekuni card flourish?

Untuk para flourisher yang baru menekuni permainan ini jangan pernah putus asa dalam berlatih,sering-seringlah melihat video-video dari para flourisher lain untuk mendapatkan inspirasi dalam mengkreasi move-move flourish.
Jangan pernah menyerah berlatih card flourish,semakin banyak berlatih semakin banyak juga ide-ide dan kreatifitas yang bisa kita dapat dalam bermain card flourish..,Kreasikanlah move-move kalian dengan membuat video-video, karena kalian pasti membutuhkan komen-komen dan masukan dr para teman2 lain sehingga akan semakin bisa mengembangkan lagi..,sukses terus untuk ICA, ICA mempunyai peranan penting dalam menampung flourisher-flourisher yang ada di Indonesia .
Abie adalah sosok yang berhasil membuktikan bahwa meraih prestasi di dunia Card Flourish bukanlah hal yang mustahil bagi Cardist Indonesia. Sepanjang anda terus berlatih, terus membuat video, mengkreasikan move-move baru dan menerima masukan dan kritik dari card fourisher lain, bukan tidak mungkin anda kelak bisa sejajar dengan nama-nama seperti Andrei Jikh atau Daniel Madison. Abie Jie Assegaff sudah selangkah lebih dekat menuju ke arah itu, dengan menjuarai berbagai kompetisi. Bagaimana dengan anda?
Maju terus dunia flourish Indonesia!
Artikel ini ditulis oleh Wiku Pulangasih, The Online Magician
Hyderabad, May 7th 2011
Kunjungi artikel-artikel sulap terbaik lengkap dengan video tutorial untuk menambah wawasan anda seputar dunia magic
1. Tips dan Teknik, Praktis untuk melakukan Astral Projection dengan sukses
2. Cerita Menarik, Suka Duka, dan Humor seputar magician The Master
3. Berminat Melakukan Street Magic? Inilah trik-trik terbaik street magic.
4. Kumpulan Sulap Mentalism dengan Efek Terkiller
5. Video Tutorial Sulap Romantis untuk orang tersayang di hidup anda
6. Magician-Magician Wanita : Terhebat, Tercantik dan Terseksi di Dunia
7. Cara Membengkokkan Sendok Dengan Kekuatan Pikiran Anda
Minggu, 27 Oktober 2013
Lirik Lagu JKT48 Kimi no Koto ga Suki Dakara Karena Ku Suka Dirimu with Music

Sobat kini tengah berada di Seri ke-2 dari Artikel Lirik Lagu JKT48 Album "Heavy Rotation".
Kimi no Koto ga Suki Dakara (Karena Ku Suka Dirimu) adalah lagu ke-2 dari 10 lagu yang terdapat di album JKT48 Heavy Rotation. Lagu ini juga merupakan cover dari judul lagu Kimi no Koto ga Suki Dakara yang dibawakan oleh AKB48.
Kimi no Koto ga Suki Dakara (Karena Ku Suka Dirimu) adalah lagu ke-2 dari 10 lagu yang terdapat di album JKT48 Heavy Rotation. Lagu ini juga merupakan cover dari judul lagu Kimi no Koto ga Suki Dakara yang dibawakan oleh AKB48.
Berikut keterangan mengenai lirik lagu Kimi no Koto ga Suki Dakara (Karena Ku Suka Dirimu) yang dinyanyikan oleh JKT48.
Lyrics by: Yasushi Akimoto
Music by: Tetsuro Oda
Arranged by: Yuichi "Masa" Nonaka
Notes: Kao Laurier CM Song
Recording Members
Ayana Shahab, Beby Chaesara Anadila, Cindy Gulla, Devi Kinal Putri, Ghaida Farisya, Jessica Vania, Jessica Veranda, Melody Nurramdhani Laksani, Nabilah Ratna Ayu Azalia, Rena Nozawa, Rezky Wiranti Dhike, Sendy Ariani, Shania Junianatha, Sonya Pandarmawan, Stella Cornellia.
Lirik Lagu JKT48 Kimi no Koto ga Suki Dakara
(Karena Ku Suka Dirimu)
Jika kamu merasa bahagia
semoga saat ini kan berlanjut
selalu selalu selalu
ku akan terus berharap
Walaupun ditiup angin
ku akan lindungi bunga itu
Cinta bagai suara yang
tak mengharapkan jawaban
Tapi dikirimkan satu arah
di bawah mentari tertawalah
(Menyanyi, menari sebebasnya!)
[Reff]
Karena kusuka suka dirimu
ku akan selalu berada di sini
walau di dalam keramaian
tak apa tak kau sadari (Aku Suka!)
Karena kusuka suka dirimu
hanya dengan bertemu denganmu
perasaanku jadi hangat
dan menjadi penuh
Di saat dirimu merasa resah
berdiam diri aku mendengarkan
ku beri payung
yang kupakai tuk hindari hujan
Air mata yang berlinang
kan ku seka dengan jari di anganku
Cinta bagai riak air
meluas dengan perlahan
yang pusatnya ialah dirimu
walaupun sedih jangan menyerah
(Langit! Impian! Lihatlah!)
Kapanpun saat memikirkanmu
bisa bertemu kebetulan itu
hanya sekali dalam hidup
ku percaya keajaiban (Ku Berharap!)
Kapanpun saat memikirkanmu
aku pun bersyukur kepada Tuhan
saat ku toleh ke belakang
ujung kekekalan
*back to [Reff]
Note++:
Lirik lagu JKT48 Kimi no Koto ga Suki Dakara (Karena Ku Suka Dirimu) ini berasal dari Lyrics Card Album JKT48 Heavy Rotation.
#Brill
Langganan:
Komentar (Atom)